
 How to adjust the contrast/brightness of the monitor (screen) image on a laptop?
Contrast comes from the English word “contrast”. Any monitor has it, be it a TV, computer, laptop or even a mobile phone. But, most often it is necessary to adjust the screen contrast specifically for the computer. If you know the algorithm of action, then this will not be difficult. Contrast is the ratio of the brightness of the lightest part of the screen to the darkest part of the screen. Settings can be made using the buttons on the monitor. Correctly adjusted contrast will improve the perception of text and images. It will also provide realistic color reproduction when it comes to digital images.
How to Adjust Contrast on Windows
So, your equipment can be of any brand (trade manufacturer), but the Windows operating system must be installed. When the computer boots, the logo of this system appears on the screen. Also, already when the computer is turned on, it is displayed on the “Start” button. Most residents of our country have just such an operating system installed.
So, you need to use monitor color calibration. Calibration will help you adjust not only contrast, but also other color parameters as needed. Everything must be selected exclusively for yourself, but focus on average indicators.
The setting method will depend on the monitor:
Some monitors have a brightness and contrast button on the front panel. Some monitors may have these controls on the back panel. Standard symbols for each characteristic will be used.
On-screen menu. For some types of monitors, as well as for laptops, configuration occurs using the on-screen menu. You can find it in the “Menu”, which will open when you click on the “Start” button. You can view the original values and set your own.
Laptop screen. It will be possible to use the brightness button on the front panel, but in older models. Modern models do not have a contrast control. Therefore, you will need to use the Fn key and click on the and icons to decrease or increase the contrast, respectively.
What are the optimal settings?
A computer screen has its own standard contrast settings that must be adhered to for comfortable work. Despite the fact that all people are different and the requirements for images may be different.
The image frequency on modern monitors is recommended in the range from 60 to 85 Hz. As for brightness, it should not be higher than 80 candelas per square meter. High contrast (this, as we have already found out, is the ratio of brightness of black and white) can make the image as clear as possible. The higher the contrast ratio, the faster your eyes will get tired. The optimal setting should be made taking into account the middle on the scale offered by the manufacturer.
Interesting! Using the NTest program, you can select the most accurate screen settings for yourself, and then set them on your computer.
These are the main points on how to configure the image on your computer. Most often, when installing an operating system, average indicators are used. But, for more comfortable work, you need to twist them in one direction or another. By the way, the perception of the image can also depend on the time of day and on how the lighting falls on the screen. All this must be taken into account when choosing characteristics for yourself. Dealing with contrast is not difficult, although you will have to spend a little personal time.
And more useful articles about contrast:
-

How to choose a voltage stabilizer for a refrigerator?
-

Will the refrigerator's operating instructions help troubleshoot problems?
-

Conversion (conversion) of 2d to 3d images on TV.
-

What is an air ionizer-purifier?
-

Ceramic multicooker - which is better, ceramics or Teflon, reviews.
When developing Windows 10, Microsoft specialists changed the familiar screen settings interface. It has become simpler, allowing users to make various settings intuitively. Determination of the optimal screen parameters occurs already during the installation of the system in automatic mode. All that remains is to configure them for a specific user, if the need arises. The set parameters must correspond to the maximum capabilities of the display screen and video adapter. This achieves the clearest graphics and color gamut.
Setting the screen resolution
Setting up the screen on a personal computer, tablet or laptop with Windows 10 is not very difficult for any user. Its interface is simple and intuitive, which allows you to modify the screen at your discretion in a few clicks. To configure:
- Click on the “Options” icon. In the Start menu, click on the Settings icon
- Click the System icon in the Settings window.
 In the "Options" window, click on the "System" icon
 - Open the "Screen" tab.
 Review your screen settings
 - Check your screen resolution. It must match the recommended resolution of the device.
- If the resolution is set correctly, click on the “Graphics Adapter Properties” button.
 Click on the "Graphics Adapter Properties" button
 - Make sure that your adapter is selected in the “Adapter Type” tab.
 Check that the video adapter is installed correctly
 - Close Graphics Adapter Properties by clicking OK.
- Change the screen resolution if necessary.
- Close the System Settings window.
- Screen setup is complete.
Other screen parameters can be adjusted as needed.
When installing Windows 10, all screen settings are usually configured automatically. The exception is rare or outdated types of video adapters, the drivers of which are not in the database on Microsoft servers. In this case, the driver is downloaded from the manufacturer’s website or installed from an optical disc that is included with the computer or laptop upon sale. It contains distribution kits of all drivers for installed devices.
Video: how to change screen resolution on a computer, monitor or tablet with Windows 10
Increase or decrease screen brightness and contrast
Brightness and contrast are some of the main screen settings. Each user adjusts them individually to their own requirements.
Contrast on laptops and tablets is adjusted automatically. On monitors and displays of personal computers there is a Menu button, with which you can adjust the contrast using the device menu.
There are several options you can apply to change the screen brightness settings.
Changing screen brightness in system settings
There are two ways to access screen options:

Video: How to change screen brightness through Windows 10 settings
Changing screen brightness using the keyboard
Almost all modern types of keyboards have the ability to change the screen brightness without resorting to system settings. Previously, only laptops had this feature, but now this function is also inherent in many types of personal computer keyboards. As a rule, you can change the brightness using two keys, which have a sun icon and an arrow indicating increase or decrease brightness. They are most often found in the upper or lower case of the keyboard.
 Use the keys to adjust the brightness level of your screen
 In some cases, you may need to press the Fn key along with these keys to change the screen brightness.
If the keys do not respond to commands to change brightness, download and install the keyboard driver from the manufacturer's website.
Changing screen brightness through Notification Center
In the Notification Center, you can set the screen brightness level only in fixed positions. To change the brightness level, follow these steps:

Change screen brightness using the battery indicator on the "Taskbar"
On laptops and tablets, there is a battery charge indicator on the “Taskbar”, which can also be used to change the screen brightness:
- Left-click on the battery charge indicator.
 Click on the battery indicator
 - Click on the screen brightness change tile.
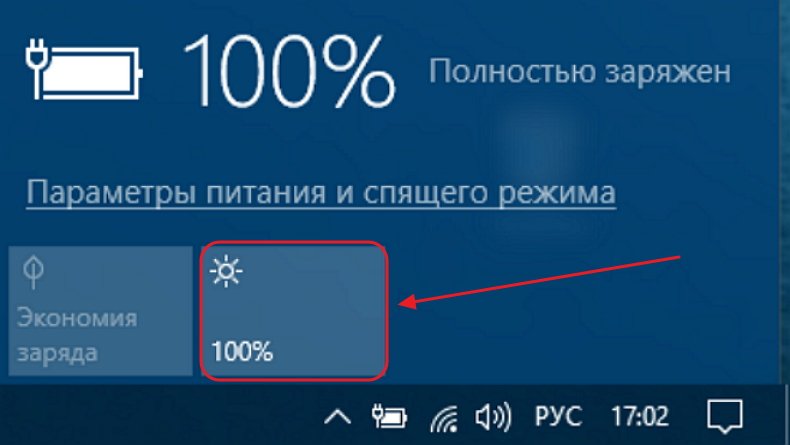 Adjust the screen brightness level
 - You can change the brightness level using fixed values from 0 to 100% in 25% increments.
- Click on the "Power and Sleep Options" tab.
 Click on the "Power and Sleep Options" tab
 - Click on the “Advanced power settings” line on the right side of the “Settings” window that opens.
 Click on the "Advanced Power Options" tab
 - In the “Power Options” window, set the required brightness using the “Screen Brightness” slider.
 Adjust the screen brightness level using the slider
 - Click on the “Power Plan Settings” tab.
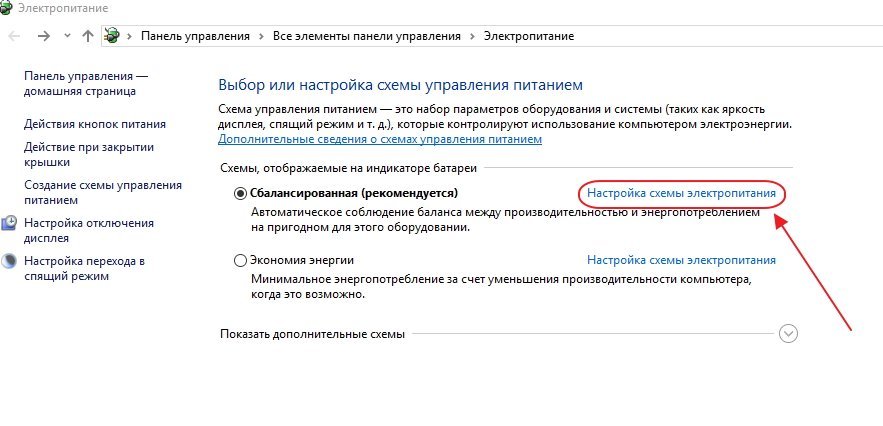 Click on the “Power Plan Settings” tab
 - In the “Change circuit parameters” panel that opens, use the “Adjust brightness” slider to achieve its optimal level when powered from the mains and from the battery.
 Adjust brightness on mains and battery power
Changing screen brightness through the Start menu
You can also use the Start key to access the screen brightness settings panel. To do this you need to do the following:

What to do if the screen is flickering
Frequent screen flickering in Windows 10 can be caused by two problems:
- using outdated video adapter drivers;
- incompatibility of the software application installed on the computer and system requirements.
The problem does not occur as often as it did when Windows 10 first began to spread.
This is due to the fact that the main companies that produce components for computers have brought their software applications to the required parameters. On those computers with video adapters manufactured 6-7 years ago, incompatibility may occur, since their drivers were not developed taking into account modern requirements.
To resolve the error, you need to find out whether the driver or software application is the source that creates the screen flickering. To solve the problem and restore normal operation of the screen and video adapter, you must use the following method:
- Right-click on the “Taskbar”.
- Click on the “Task Manager” line.
 In the menu, click on the line “Task Manager”
 - Check for blinking in the Task Manager panel. If the panel blinks along with the screen, then the reason is the old video adapter driver. If this does not happen, then the reason is in one of the installed software applications.
 Check for blinking Task Manager panel
 - Double-click the “Control Panel” icon on the “Desktop”.
 On the “Desktop”, double-click on the “Control Panel” icon
 - Click on the “Administrative Tools” icon in the “All Control Panel Items” window.
 Click on the “Administration” icon
 - Double-click Computer Management in the Administrative Tools window.
 Double-click on “Computer Management”
 - Expand the Event Viewer tab in the Computer Management window.
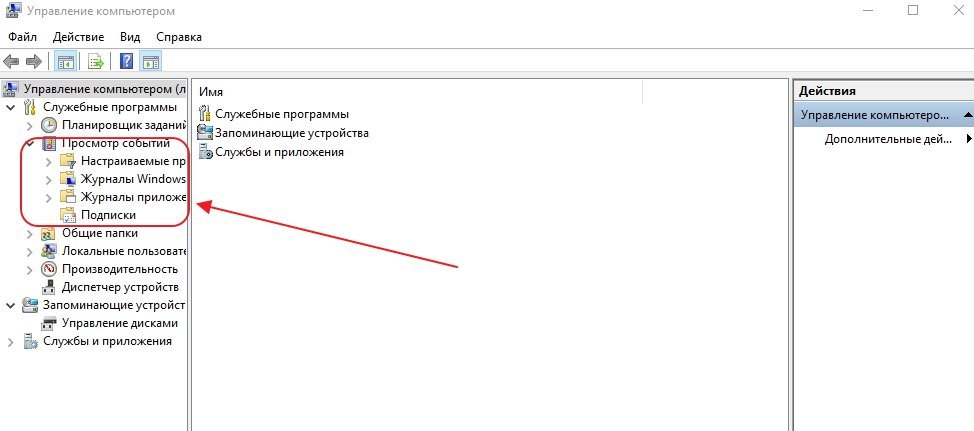 Expand the Event Viewer tab
 - Expand the Windows Logs tab.
 Expand the Windows Logs directory
 - Check the Application and System tabs for errors.
- If a software application compatibility error is detected in the “Application” tab, then remove it. Then download the latest version of the application from the developer’s website and install it on your hard drive.
 Click on the Application tab and check for errors
 - If an error in the “System” tab indicates that an updated video adapter driver is needed, then perform the same operations as for the software application to replace it.
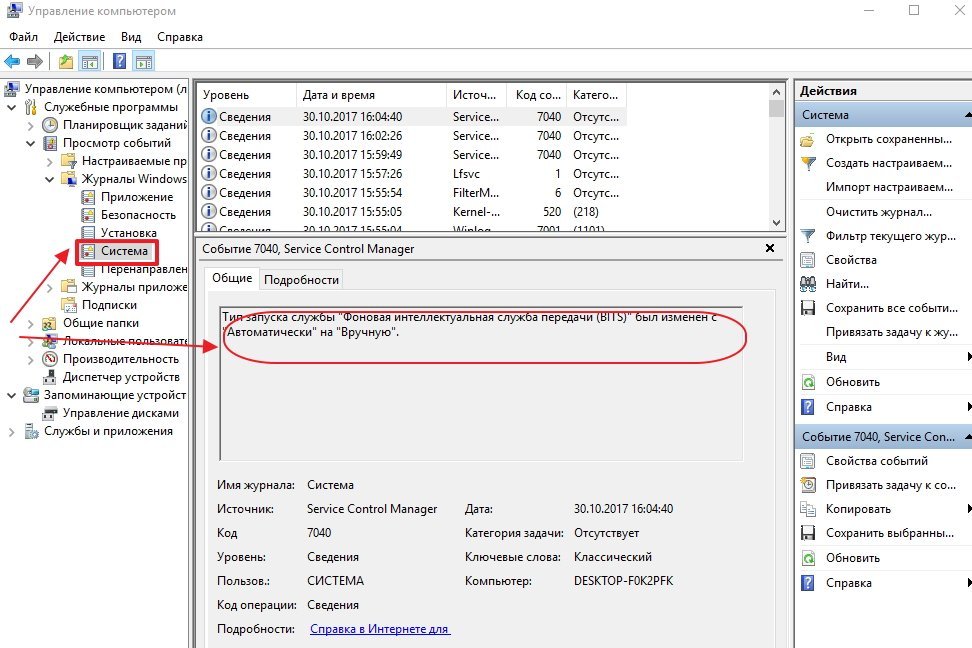 Click on the "System" tab and check for errors
Video: how to update video adapter drivers in Windows 10
What to do if applications or games do not open in full screen
All modern programs automatically adjust to the screen size. If you install an application or game that was developed many years ago for older editions of Windows, then it can be deployed in a reduced size. In this case, it becomes necessary to expand them to full screen. There are several ways to solve this problem:
- Using hot keys:
- Press the Alt and Enter keys on your keyboard at the same time;
- the application will expand to full screen;
- When you press the keys again, the application will return to its previous state.
- Changing launch options:
- right-click on the game or application icon on the “Desktop”;
- Select “Properties” from the drop-down menu;
 Select “Properties” from the drop-down menu
 - in the panel that opens, click on the “Compatibility” tab;
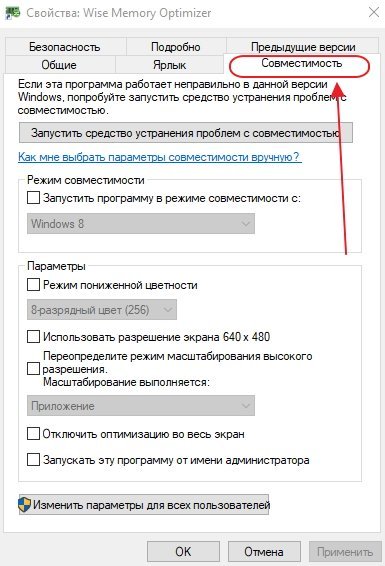 Click on the Compatibility tab
 - press the “Run Compatibility Troubleshooter” button;
 Click on the "Run Compatibility Troubleshooter" button
 - If the application is not maximized to full screen, then check the “Compatibility Mode” box and select the required edition of Windows from the drop-down list. Please note that the Windows 10 edition is not listed. Last on the list will be Windows 8.
 Select the required edition of Windows
 - Click the "OK" button.
- Update video adapter drivers:
- determine the video adapter model in “Device Manager”;
- go to the manufacturer’s website;
- download and install the new driver.
- Changing game graphic settings:
- launch the game;
- go to settings;
- find the item for changing screen settings;
- set full screen mode;
- restart your computer.
- Changing screen resolution:

If a game or application requires a screen resolution of 640X480, then you can set it in the “Options” block on the “Compatibility” tab. But it must be a very old game or application that was created during the introduction of Windows into the software market.
Video: How to run an application in compatibility mode in Windows 10
Calibrate the touch screen on Windows 10 tablets
The touch screen must be calibrated to ensure that the tablet responds adequately to finger touch. If the device is not calibrated, then instead of the letters you press, others will appear on the screen or the image will rotate one hundred and eighty degrees.
To calibrate the touch screen, you need to do the following:

Disable turning off or dimming the screen
With prolonged inactivity, the display screen goes dark after a certain period, and after a few minutes the computer goes into sleep mode, turning off completely. In the system parameters, you can set the option to turn off sleep mode and screen dimming. To disable the energy saving mode, you need to perform a number of operations:
- Left-click on the “Start” button.
- Open Settings.
- Select the "System" section.
- Click on the “Power and Sleep” icon.
- Click the "Advanced power options" button.
- In the “Power Options” window, click on the “Configure power plan” button.
 Select "Power Plan Settings"
 - In the “Turn off display” line, disable screen dimming when running on AC power or battery power. To do this, select “Never” from the drop-down lists.
 Select "Never" from the drop-down list
 - Similarly, in the fields next to the “Put the computer into sleep mode” icon, disable putting the computer in the off state.
 In the drop-down list, click on “Never”
 - Click "Save Changes".
Video: a non-standard way to disable screen dimming
One of the main criteria for a graphical interface is brightness, contrast and color gamut. The clearer the display of graphic objects looks, the more comfortable the work will be for the user. Therefore, do not neglect spending a few minutes in order to achieve maximum effect when displaying graphics and text documents. It should be remembered that incorrectly setting the screen parameters also affects the user’s visual system and can lead to a gradual deterioration of vision. To adjust the screen and fix minor problems with the image, you can use the methods given in this article. If they do not lead to the desired result, then you should contact the service center specialists.
Related posts:
No similar entries found.
To work comfortably at the computer, so that your eyes don’t get tired, sometimes you need to change some screen parameters. One of these is brightness. Let's look at several techniques to help you understand how to adjust the brightness on your computer (we'll take Windows 7 solely as an example of the operating system's working environment).
Standard screen brightness setting regardless of system
To set the necessary parameters, you should distinguish between computer systems in terms of their design.
In desktop PCs, the monitor is a separate component, so adjusting the screen brightness in Windows 7 or any other system is done either using special buttons placed on the front or from its own menu, called up on the monitor itself.

In laptops, the screen is an integral part of the entire design and does not have buttons for setting the necessary options. Configuration is carried out using keyboard shortcuts. In most cases, the main one is used. In addition to it, function buttons (F1-12), up/down arrows, right/left and other combinations can be used.
How do I adjust brightness on my computer (Windows 7) using personalization?
As for the settings using Windows 7's own tools, there are several basic options. And it starts with personalization.
How to adjust brightness on a computer? For this purpose, Windows 7 offers quick access to the main parameters, which is done by right-clicking on an empty area of the “Desktop”. In the new window you will be able to see quite a lot of customizable characteristics, where you can select the desired parameter.
How to adjust computer brightness (Windows 7) using power plans?
An equally simple way to configure is to change the desired parameter in the choice of power supply scheme. This section can be accessed on desktop computers from the “Control Panel”, and on laptops it is enough to right-click on the battery icon in the system tray. In Windows 7, the transition will occur exactly in the section we are interested in (in the tenth version, the brightness can be adjusted directly from the menu that is called up).

How to adjust brightness on a computer (Windows 7) using this method? Very simple. You need to select the scheme you are interested in and call up additional parameters. Several basic options will be presented here. Just below the main settings there is a special slider, which allows you to change the display.
Adjustment can also be made from the “Screen” section, which provides options for turning off the display, most often used in case of prolonged inactivity of the system or when sleep mode (hibernation) is activated.
Using graphics utilities
An equally interesting way to understand how to adjust screen brightness on a computer (Windows 7) is to use specialized utilities and video card management programs, which are usually installed initially for graphics adapters. In most cases this applies to NVIDIA and ATI Radeon cards.

Such applications and quick access panels to settings are in some ways alternative tools to Windows-based systems and often allow for more fine-grained settings using an expanded functional set that is simply not available in standard systems.
What to use?
Of course, if we are not talking about advanced customization, the easiest way is to adjust the brightness and other parameters by means independent of the system or video card. But when you need more fine-tuning, it's worth comparing the capabilities of Windows and the toolbox of utilities for graphics adapters. In any case, they can even be used in parallel.
I’m answering the following question: my nephew did some work, the brightness of the laptop screen has changed, how can I restore it?
Let's consider three options for changing the screen brightness:
- using Power Supply (the most efficient option),
- pressing the function keys of the laptop,
- using a special program built into the laptop.
Let's look at the Power Options settings
For the Windows 7 operating system, click Start, then Control Panel, and at the end of the list that appears, click on the Power Options link.
Or click on the Start button and enter Power Options in the bottom Search bar. Click on Power Options that appears as a result of the search.
At the very bottom of the “Select power plan” window, move the “Screen brightness” slider to adjust the brightness (number 1 in Fig. 1, pictures are clickable):
Rice. 1. Change laptop screen brightness
If the “Screen Brightness” slider is not active, that is, does not respond to attempts to move it, then this may mean that the laptop is not designed to adjust the screen brightness (laptop manufacturers saved on this), or it is worth upgrading the monitor.
Additional options for adjusting brightness
How else can you adjust the brightness of a laptop? After you select one of the power plans:
- balanced or
- high performance

Rice. 2 (click on the picture to enlarge). More options to change laptop brightness
2 in Fig. 2 – click on the plus sign opposite “Screen”,
3 in Fig. 2 – open “Screen Brightness” by clicking on the plus sign. If you click on one of the numbers 58% (and you, of course, may have other numbers), then you can edit them and set others that are more convenient and suitable for you.
How to set the time after which the laptop screen goes dark?
Go to Start – Control Panel – Power Options (Fig. 1). Click on the “Set up power plan” button (number 2 in Fig. 1). The “Configure power plan” window will open:

Rice. 3. Setting up a laptop power plan
Here you can select the time for the Dim Display and Turn Off Display options when running on battery or plugged in. Don't forget to click the "Save Changes" button if you made any changes.
Pros and cons of function keys when adjusting laptop screen brightness
On the laptop there is a way to change the brightness of the screen among F1-F12 with an image of the sun and next to “+” to increase the brightness, or “-” to decrease it. You need to hold Fn and the corresponding one from F1-F12.
The bad thing about this method is that Windows can then easily return everything back. Therefore, it is better to make settings using a proprietary Windows 7 tool, that is, through Power Options, described at the beginning of the article.
By the way, if you reinstall the laptop operating system from a non-native distribution, then many of the functions of the laptop’s function keys will NOT work, unfortunately.
Changing the brightness of a laptop screen using a special program
Advanced laptops may have their own advanced options for adjusting screen brightness. For example, AUTOMATIC screen brightness adjustment. If you set this option, the screen brightness will automatically increase in bright light and vice versa.
For example, Sony Vaio has such settings in the Vaio Control Center program.

Rice. 4. Automatically adjust the brightness of the Vaio laptop screen
Select the “Display” option, and in it – “Automatic brightness settings” (number 1 in Fig. 4). Here you can uncheck the box next to the “Automatic brightness adjustment” option (number 2 in Fig. 4). Don’t forget to click “OK” (number 3 in Fig. 4) to save the changes if they have been made.
For other laptop models, such settings (or lack thereof) can be found in the instructions for this laptop, which can be in paper or electronic form.
Users of the Windows 7 operating system often encounter a problem screen brightness settings. To fix this problem, we will look at all the available ways to adjust the display brightness in Windows 7. Adjusting the screen backlight is a fairly simple process that even a novice user can handle. After familiarizing yourself with the material, you will be able adjust the brightness yourself laptop or desktop computer.
Adjusting brightness using standard Windows 7 tools
To set the brightness of a laptop or all-in-one PC using standard 7 tools, first of all you should go to Control panels. You can go to the Control Panel through the menu " Start"or type in the program " Execute» control command
After launch Control panels you need to go to the "" section.

You can now increase or decrease the screen backlight. To do this, set the slider " Screen brightness» to a position that matches your monitor backlight preferences.

You can also go to settings power plan and exhibit brightness, in which the laptop will operate on battery power or mains power.

Changing screen lighting settings using the video card driver
Another interesting way to change the display lighting is to adjust it using video card drivers. For our example, we will consider a driver from the company Nvidia. To open the video card driver settings, you need to right-click on an empty space on the Desktop. A context menu should appear.
In this menu, select the item “ NVIDIA Control Panel"(this may be different for another video card), after which the video card driver settings panel will open.

Now in this panel you need to go to the menu “ Video\Adjust color settings for video».

In the color adjustment menu, go to the “ 2. How to make color adjustments" and set the switch " With NVIDIA settings" By selecting these parameters, you will be able to adjust four properties, including display brightness. To increase or decrease the brightness of the display, drag the slider towards plus or minus and you will see how the screen backlight changes.
Video card manufacturers also have such programs that regulate screen lighting using the video adapter driver. Intel And AMD.
Also on the Internet you can find many programs that adjust the display backlight. All such programs work by accessing the video adapter driver. That is, in essence, they do what you can do in the control panel of the video card (in our case Nvidia). The most interesting of all such programs is F.lux. Its main feature is automatic adjustment of display backlight, which depends on the time of day.
An example of adjusting the laptop backlight using the Fn key
For example, we will use a Lenovo s110 netbook with the Windows 7 operating system.
It uses the Fn modifier key in combination with the ← and → cursor keys to adjust the backlight. To increase the backlight of the Lenovo s110 laptop, you need to use the key combination Fn + →. To lower the backlight you need to use the combination Fn + ←.
 As you raise or lower the backlight, you will see how the value of the graphic indicator changes. The program is responsible for this indicator Hotkey Features.

As you can see, increase or decrease the laptop screen lighting settings using the " Fn", quite simply. You can use this example on other laptops, since the principles of using modifier keys are the same.
Particularly on laptops SAMSUNG NP350 keyboard shortcuts:
- to increase brightness - Fn + F3;
- to decrease - Fn + F2.
Manually adjusting the monitor backlight
For desktop computer users, screen lighting settings can be adjusted on the display itself. For example, we will use a monitor LG Flatron W1943SS. To adjust the lighting, you need to go to its menu. To do this, press the MENU key on the monitor control panel.

After this, press the AUTO/SET key. A brightness adjustment window should open where you can change it.

I would also like to note that the monitor settings do not depend on what OS or driver is installed. They are regulated exclusively in the monitor. Each monitor from a different manufacturer has its own manual settings options. You can find out the details of adjusting the screen lighting parameters of a particular monitor in the manual, which is included with the sale or can be downloaded in electronic form on the manufacturer’s website.
Let's sum it up
This material shows that even a novice PC user can increase and decrease the brightness of the display in Windows 7. And we hope that our material will help you learn how to change the brightness of your computer monitor.
Video on the topic